
Saturday, 28 November 2015
Kärshult cushion
When I was in the house in Sweden I was inspired to make a quilt. I also wanted to make something to give to the house as a gift. Making a second quilt would have taken too long (it's been 7 months since we were there and the first quilt is not finished) so I decided to make a quilted cushion cover. Originally I wanted to use one of the log cabin blocks from the quilt but when I was experimenting with the colours I made a block that I knew wouldn't work in the actual quilt but which would be great for the cushion. The difference is only in the main quilt the central colour is dark blue whereas in this block it is yellow.
I've quilted in the same way as the main quilt with straight lines. I'm quite pleased with it. I did originally want the other side to be plain with perhaps an envelope opening but on reflection I'm going to make it reversible. I want to have flying geese and the dark blue fabric in the cushion to represent the weekend as it was for me.
Kärshult. Quilting.
I've made an effort to get the quilting complete on this project. The issue is it's so large manipulating it through the small harp space of my machine is a pain. And because I can't move it about I have had to stay with straight line quilting and many, many thread breaks. It was frustrating at first so I only did a little at a time however I'm now in a routine with it so it's not too bad.

There are 6 of these sections, each with 4 log cabin blocks. In the dark section I have quilted radiating lines from the point of the dark green to points at the ends of the strips (11 lines in total each log cabin block). This is to represent the rays of light/star light as it's a starry night block formation. In the light sections I have quilted 2 parallel lines in each strip. I've also tried to stitch in the ditch where possible however the high number of thread breaks is bad enough giving myself more. So apologies to Cindy Needham, who always does this and whom I respect deeply for her wonderful quilting knowledge, but I would have grown to hate the quilt if I'd had to do any more thread breaks.
I have 2 of these sections complete and another started. There is light at the end of the tunnel! All the other quilting is done (borders/flying geese) so when the log cabin sections are complete I'll have the binding and label to do.
It has been an interesting project. My family like it best of the quilts I have done so far. And I have learned so much. The most important being I will be doing quilt as you go or smaller quilts from now on.
Monday, 2 November 2015
Kärshult. Quilt top.
I've completed the quilt top. In the end I didn't use the yellow fabric. It just didn't seem to fit anywhere. It's not a huge problem as I really just chose it thinking I needed another light colour but it was too bright to be light.

I was pleased with how the flying geese turned out. They were a bit of a pain to master (I still haven't got the hang of the Fons and Porter ruler) but they look better than I thought they would in the quilt.

I know it looks as if they are sewn in strips along the length of the quilt but due to the shape of it I'm going to have it lie across the bed with the flying geese at the head and foot. It's too long to lie the other way.
So much for quilt as you go! It's huge. I think I was nervous about the QAYG method. It's not something I have done before and I didn't want to spoil this quilt making a mess of it all. I am going to try that method but will start with something smaller and more experimental. So as I completed every part of this quilt I just kept sewing them together as that's what I am familiar with.
Because of this I've decided not to free motion quilt. It's just too large to manoeuvre through the machine when I'm not confident to begin with. I'm going to use my walking foot and straight line quilt. Like the QAYG I'm going to attempt FMQing with a smaller project. No need to make my life even more complicated. Quilting is supposed to be fun.
Thursday, 22 October 2015
Kärshult. Flying geese.
I decided only to have flying geese on two sides of the quilt (the shorter sides) as it's going to be too big with all the borders. Calculating the measurements worked out I needed 48 flying geese units on each side.
It's been a bit of a pain with them as I bought a Fons and Porter flying geese ruler but just couldn't get nice, flat blocks when I used it. So I used the method whereby you cut a rectangle and 2 squares (see previous post)


They still aren't super flat but I'm happier with them than my first lot.
I also had a think about how I want to quilt the blocks. I originally wanted a quilt as you go method; so doing each log cabin 4 square block individually then sewing them together and then adding the borders. Eventually I decided against it as the reason I wanted QAYG was to help with the free motion quilting but I just didn't like the idea of piecing all those blocks together.
I have decided to sew all six log cabin squares together with sashing (the white on white fabric) also putting a sashing border around the circumference of all the blocks. I'll then make up the quilt sandwich, quilt, then do the borders at the end. I may regret it but that's my current plan.
I love the backing fabric I have. It's a lovely blue and busy enough to hide my inevitable fmq errors.

It's been a bit of a pain with them as I bought a Fons and Porter flying geese ruler but just couldn't get nice, flat blocks when I used it. So I used the method whereby you cut a rectangle and 2 squares (see previous post)

I have used the light and dark greens, the brown, the light and the dark blue and the orange. The geese part is the white on white fabric. I didn't use the yellow as that will be my border.

They still aren't super flat but I'm happier with them than my first lot.
I also had a think about how I want to quilt the blocks. I originally wanted a quilt as you go method; so doing each log cabin 4 square block individually then sewing them together and then adding the borders. Eventually I decided against it as the reason I wanted QAYG was to help with the free motion quilting but I just didn't like the idea of piecing all those blocks together.
I have decided to sew all six log cabin squares together with sashing (the white on white fabric) also putting a sashing border around the circumference of all the blocks. I'll then make up the quilt sandwich, quilt, then do the borders at the end. I may regret it but that's my current plan.
I love the backing fabric I have. It's a lovely blue and busy enough to hide my inevitable fmq errors.

Small Hexagon Quilt
I must think of a better name for this quilt.
I'm getting on quite well. I do enjoy the hand sewing. It's very relaxing to watch TV or a Craftsy class and sew the pieces together.
Here is where I am at with it:

The top row is half completed and I turned it wrong side round to show the paper hexagons.
I'm getting on quite well. I do enjoy the hand sewing. It's very relaxing to watch TV or a Craftsy class and sew the pieces together.
Here is where I am at with it:
The top row is half completed and I turned it wrong side round to show the paper hexagons.
Fan design scarf
I began this scarf some months ago made from Hjertegarn Kunstgarn, in the Rainbow shade. I bought the wool from Harbour Yarns Seaham and thought it would be perfect for a scarf. I've been doing it as my watch the TV/in the car project. I used up the ball I bought but wasn't happy with the length so bought another ball.
I used a fan lace pattern and crocheted extra fans to each end to make it look prettier. The finished scarf is 190cm so it's long enough to double up and knot the way I wanted.

Wednesday, 21 October 2015
Small hexagon quilt
I started this quilt a while ago after buying some fabric from High Street Quilting. They were in those lovely baskets with juicy bits and pieces you find in fabric shops. I can never resist. At the time I had no ideas or thoughts about what they could become.
That same day I bought a Quilt Now magazine and, by lucky chance, there was a free gift of 250 1 inch hexagon papers. If that's not fate I don't know what is. So I had the idea of making lots of small hexagons in each of the three fabrics and arranging them in a swirling pattern. Sort of more concentrated at the bottom and diffusing out nearer the top. The filler will be white hexagons.
I took it to Denmark when we were there in September and it was very pleasant to sit outside the hotel room in looking out over the Præstø Fjord and sew. The weather was beautiful too.


EPP is ideal for taking with you as you are out and about, I sew in the car on the way to work sometimes. I'm not sure how many of each colour I have but here are the three lots I sewed up. I also made some white fabric hexagons.

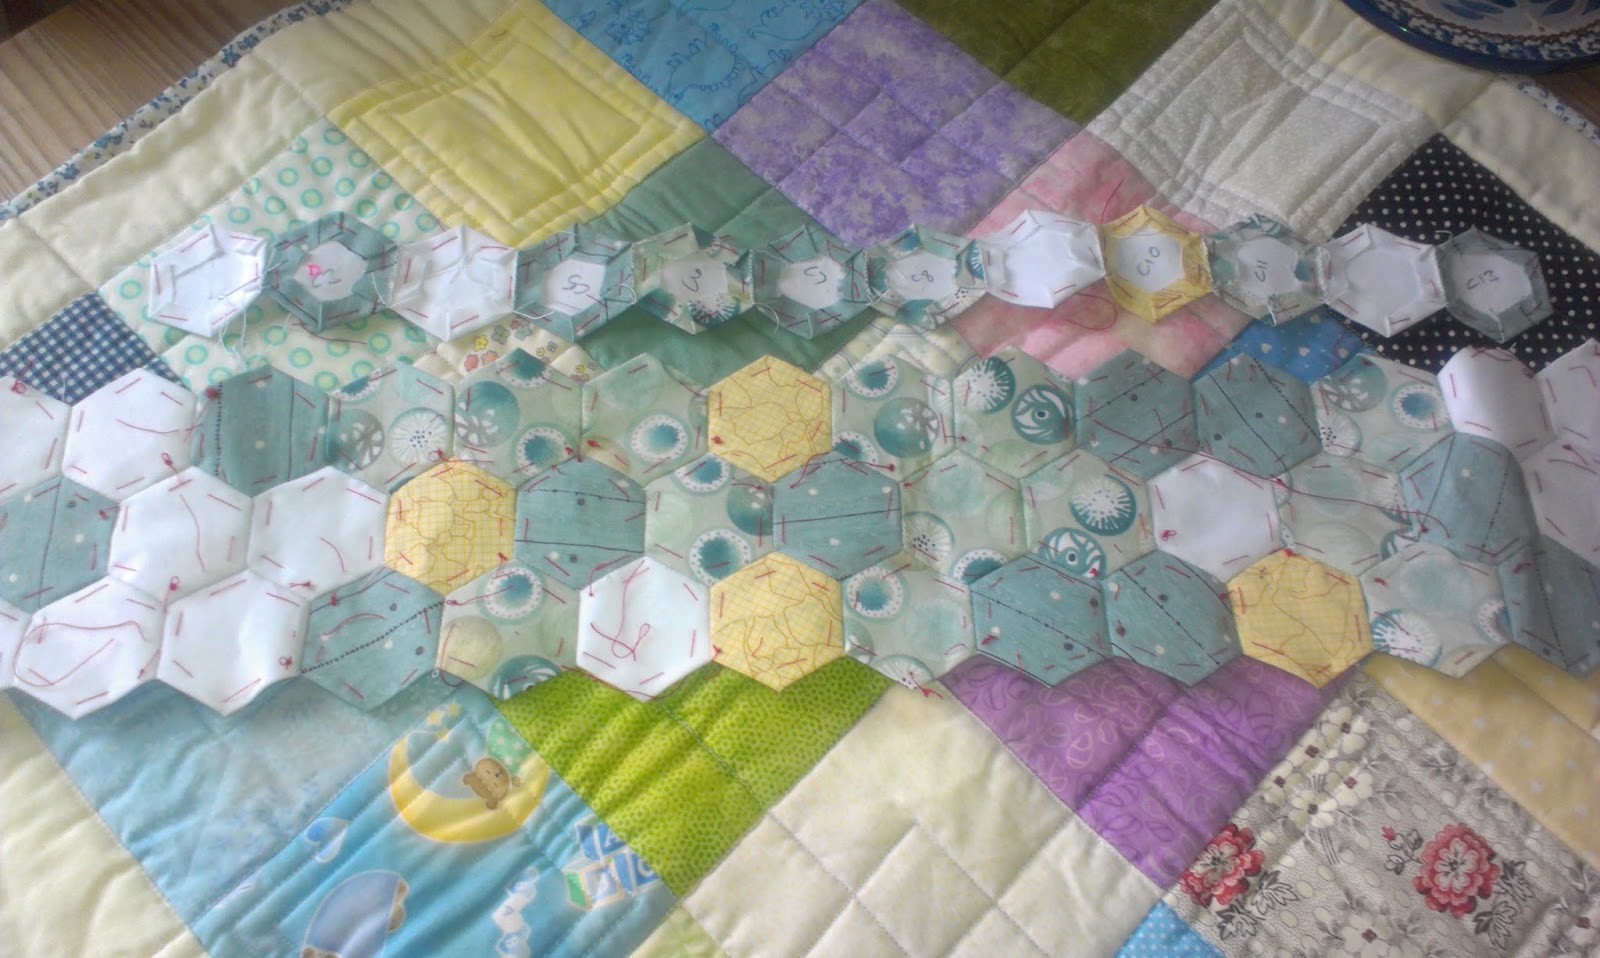
My idea is to have the hexagons 'floating' upwards from an area more concentrated at the base and diluting with white hexagons as they go upwards. I arranged them on a white background to get the shape I wanted.

Once I was happyish with this layout I marked each paper hexagon with a row letter and a place number. So B5 or N12. I gathered them up into piles of rows and clipped them together.

The next step is to sew each row together in the right order then sew all the rows to each other.
Subscribe to:
Posts (Atom)